woodworking

Cryptic Woodworks Weekly Update 27 Jan 2019

So, the last two weeks were a little slow. It happens when you are an independent with a day job. That day job needed a bit more time as i have a new resource on board to train up and work into the team. Add onto that a problem with my right arm and I was slowed down a bit. Looks like the arm issue is in my neck, maybe a herniated disc that I’ll need to start physical therapy for. I’m hoping it goes well and I get my shoulder, neck and arm back soon. It doesn’t feel really bad, but some positions are sore/painful and other make my hand tingle and fall asleep. Aging, I guess. Comes with the territory. I’ve handled every other injury and come out on top. This won’t be any different!

IMG_3459.jpg

Some work went on, regardless of health or day work. Well, when I say work, what I really mean is the most difficult shelf ever made. If I was to ask you to make a simple shelf out of 2x4s that’s only 24” high you’d think, what, maybe a few hours, tops - and that’s if you need to get supplies. Well, strap in for this ride. I had a bunch of 2x4s sitting outside that used to hold lumber and firewood. They’ve been in the elements for years but were still decent, I just needed to do a quick joint, rip, plane to clean them up. That went pretty well till I realized I needed a little bit more. Of course, everything left outside was kinda wet - I had grabbed all the driest stuff. Luckily the fireplace was lit, so a few hours in front of that dried them enough. All the pieces cut, I grab my drill and Kreg jig to join it all together. After drilling a few holes, my trusty old Bosch portable drill shoots sparks out at me. Yep, drill died. So, my wife found our old corded Craftsman drill out in the barn which while it worked, would slip a lot and oddly enough lacked the power of the battery version. However, the job was done, all the pockets drilled. I only had 2 1/2 Kreg screws, but I thought they might work and they did for some of the parts. Others, though, they were too long. By this time it was late on a Sunday, too late to get more. Monday came and over lunch I picked not just the Kreg screws but a new pair of Bosch batter drills. That evening I did wrap up the work, but at this point I’m 3 days into a really simple project. But hey, I got new drills out of it!

IMG_3456.jpg

If you are wondering about the drills, I had a 5-7 year old Bosch 18v drill driver that had served me well. Especially around the farm it could drill through fence posts, assemble chicken coops, put raised garden beds together, you name it. In the shop, it did everything. Worst problem I had was it maybe being a little too big for some smaller projects. I always like it. What I picked up was a Bosch combo set which had the 18v drill driver and an impact driver along with 2 new batteries and a charger. Seems like my old batteries fit these too!. The drill driver is just as powerful and a somewhat lighter than the old one. The impact driver is much smaller. We got a chance to try the impact driver and let me say, these live up to their hype. They are meant for driving screws and do so with zest. We threw together a quick roost for a chicken living inside a bit and the little impact driver punched 2” deck screws through 2x4s with nary a pause. I am going to like this when working around the property! All that I needed was a proper “passing of the bits” ceremony.

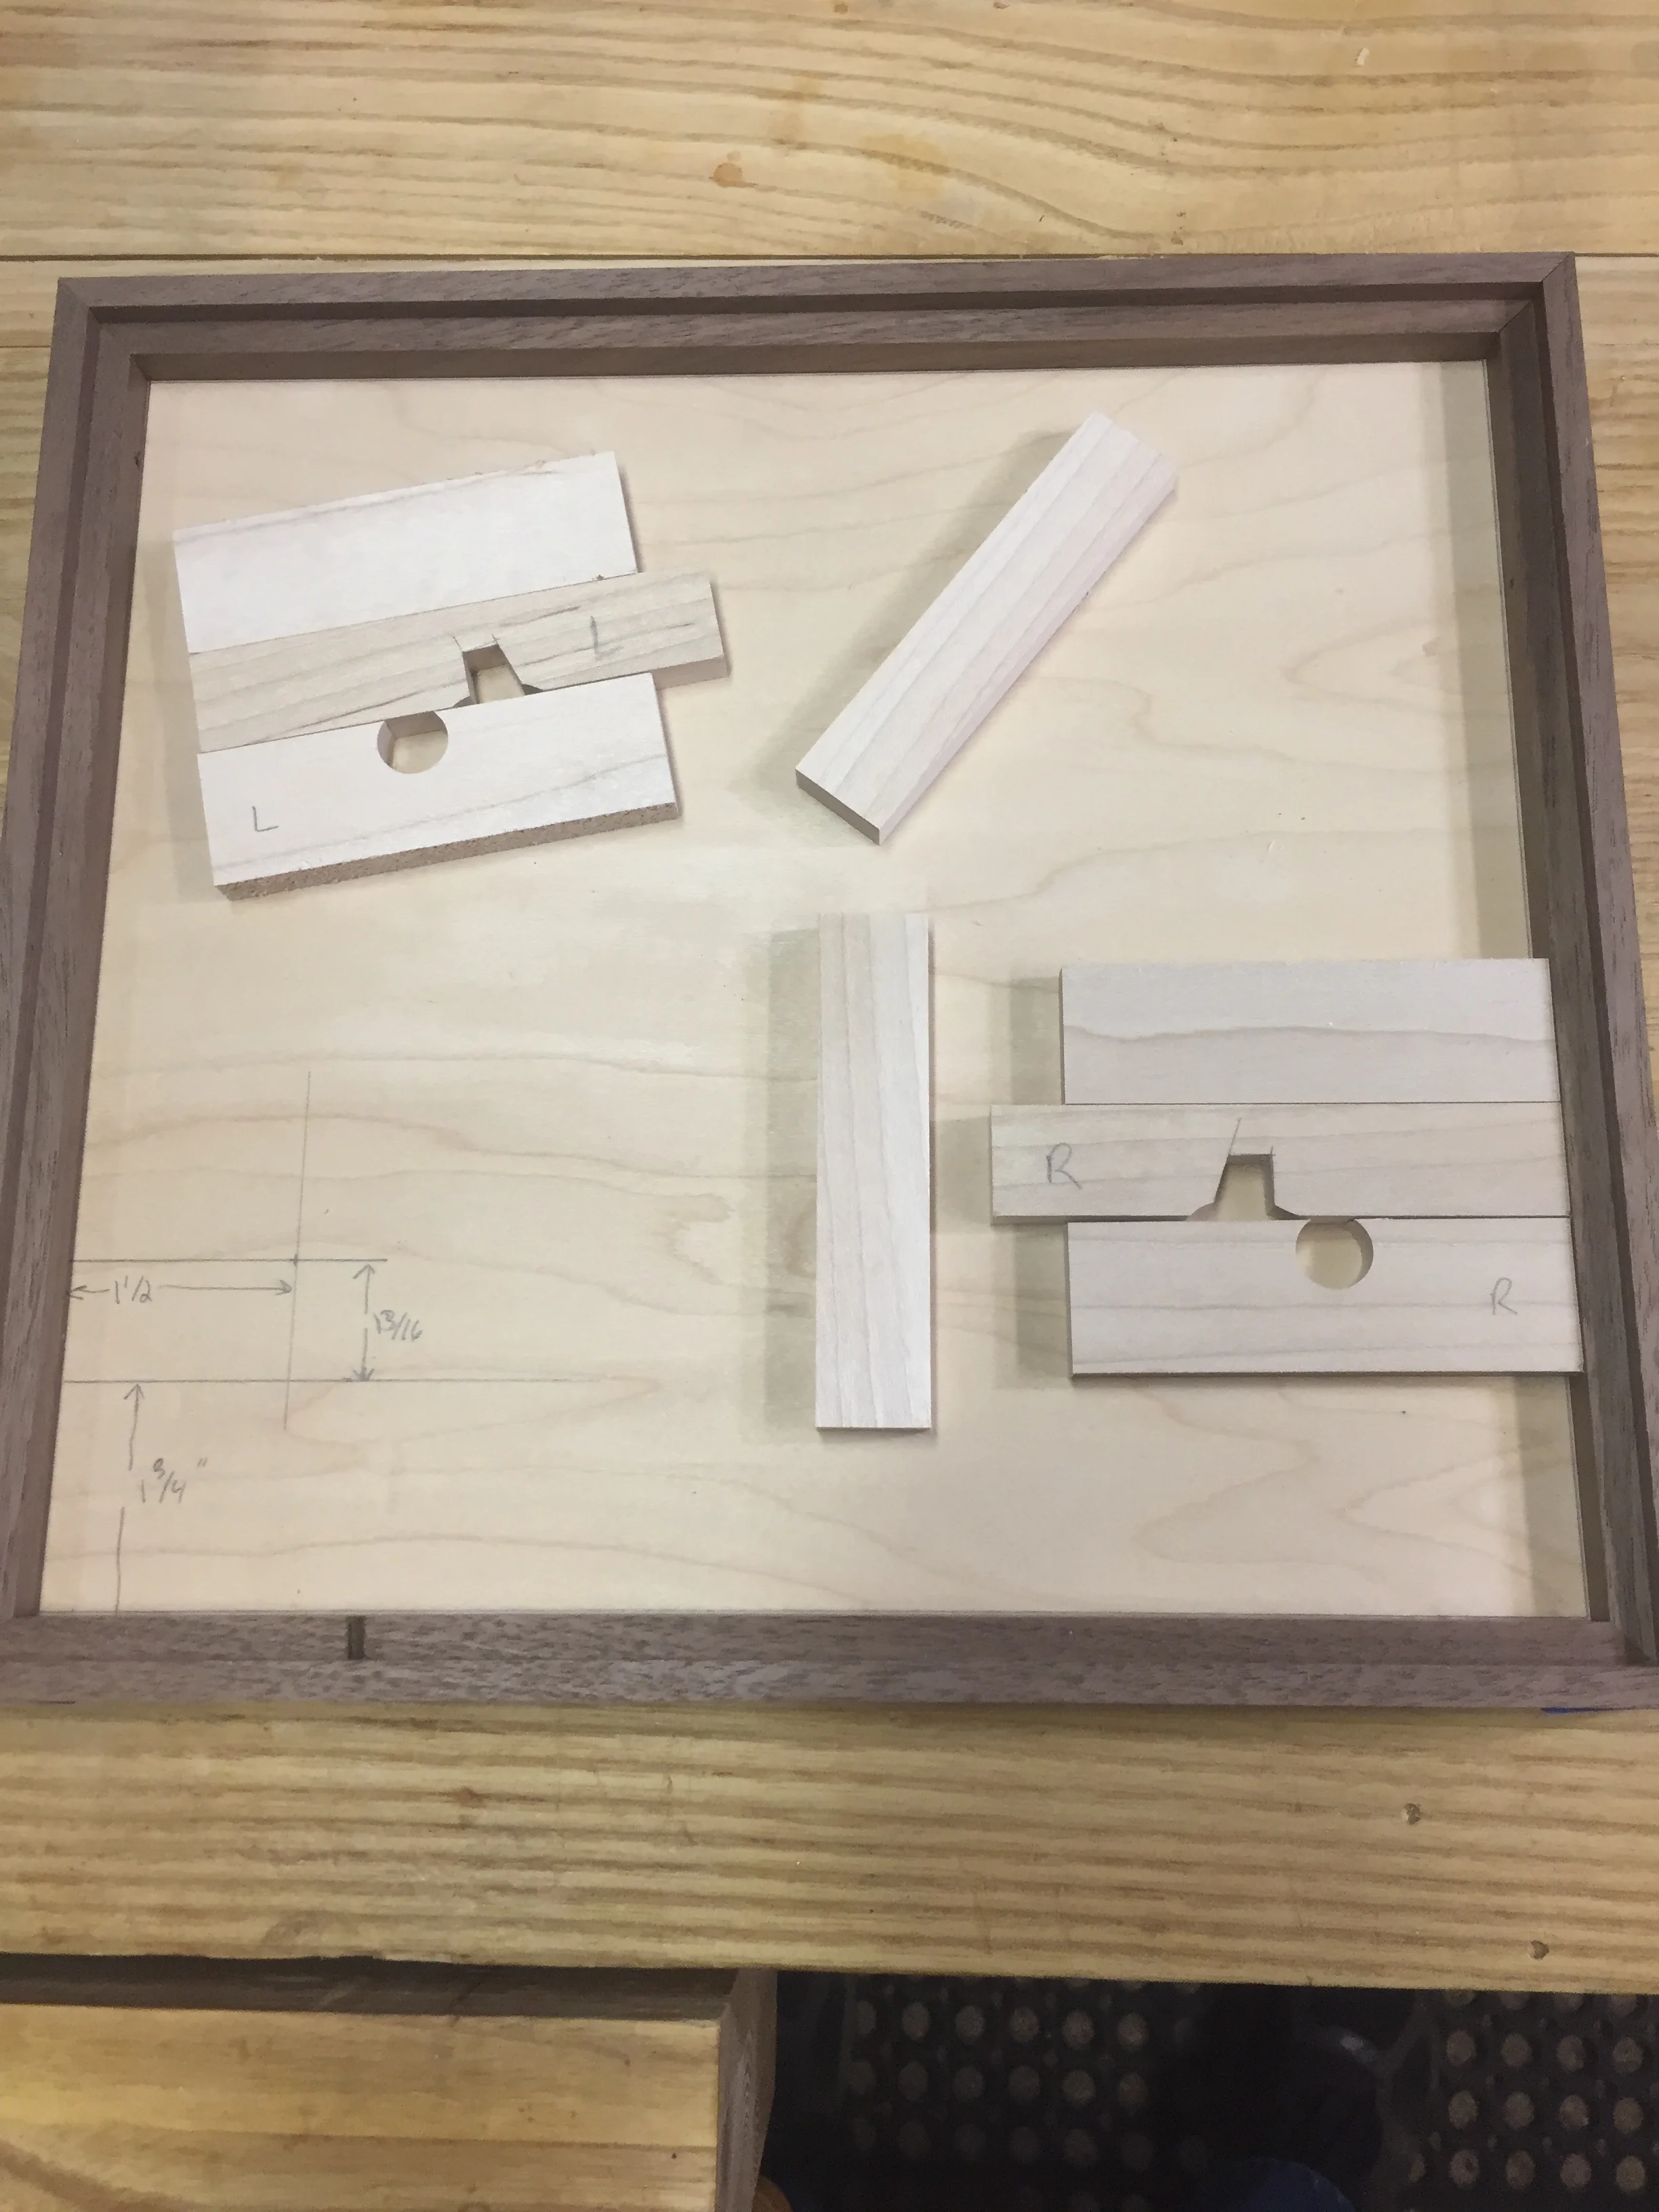
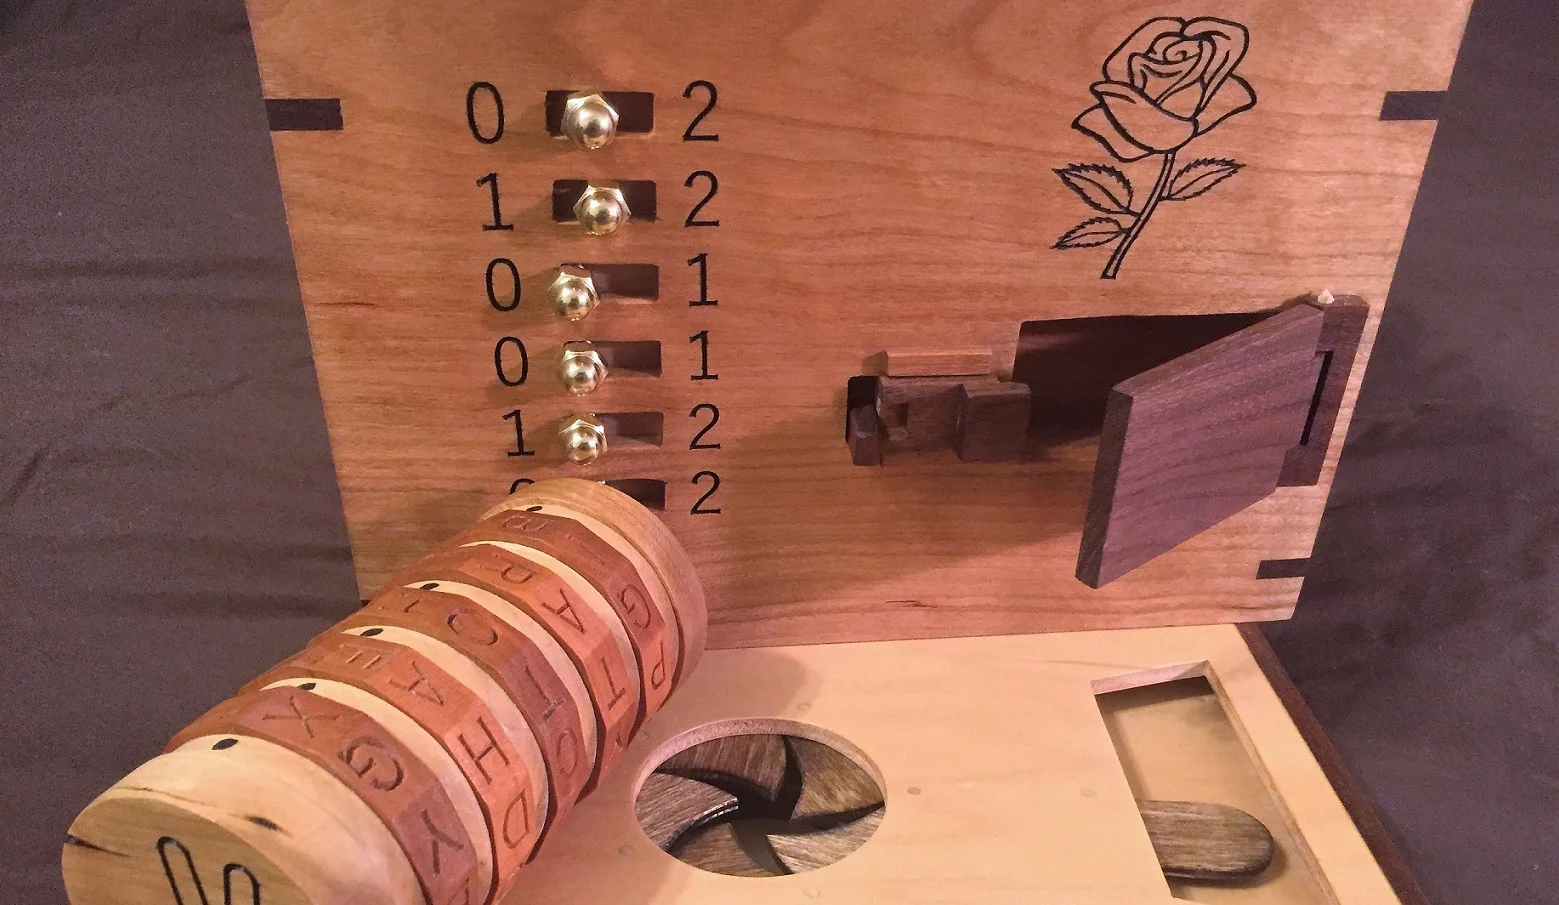
I spent a few nights taking care of the photography and video of the engagement box. i won’t get another chance, so I wanted to make sure I got everything I needed now. I’m currently using just my iPhone and my shop lighting isn’t the best, so I’m really glad of photo editing tools. I got a lot of nice pics, plus a full video showing the whole box. I won’t post anything until it’s in the hands of the client, though. In terms of shipping, I’m just trying to figure out the best way to ship from the US to Australia. USPS seems the cheapest but they tell you nothing about properly filling out the customs forms and declaration. UPS seems nice but their cost estimator was 4 times higher which seems really weird. So, I’ll drop by the UPS store and check with them, see what they provide and if that estimate is at all accurate. I’d love to send it on it’s way this week!

Lastly I upgraded my old 8.5 version of V-Carve Desktop to 9.5 - this is the software that makes the designs for the CNC. The older version worked fine, but as I’m between projects I felt this was a good time to upgrade. Price was reasonable and there are some features I wanted. 2 sided cutting, better snap to grid, easier control of layers. I’ll be using it shortly as I design the sign I need to make that will close out all my old tasks. I’d like to do something that has a nice 2.5D carving as I haven’t done much of that. If you have a project, why not have some fun!

I’ve been looking at a Cricut. It’s a tool generally used by crafters, quilters and such. But, they are amazing at making stencils and can do much more fine work than a CNC since they essentially work as a drag knife. They are good at papercraft and scripting too. It could be a machine that gives me neat new capabilities.

That’s been the last few weeks. I’m looking forward to working on new puzzle boxes soon and have a bunch of ideas in my head. I want to add more puzzles, more complexity, more codes and a lot of uniqueness. It should be a fun year.

Until next time, stay dusty.

Cryptic Woodworks Weekly Update 06 Jan 2019

Wow, the first update of 2019. I hope everyone had a great Christmas, New Years and all the other holidays, whether Merry or Happy. it’s all good. It was nice for me, a few rather quiet days, visit with family, see some friends and even got out to a local art museum I’d never been too. Played a bunch of Hitman 2 (yeah, I’ve been a gamer for a loooong time), drank a bunch and ate a lot of cheese.

Making Puzzle Boxes.jpg

With the break over, it was time to get back to work. Well, actually I was working just before Christmas too. I had wanted to make a set of simple puzzle boxes as gifts. I started these on the Saturday before Christmas. That gave me 3 whole days, piece of cake. Well, the initial construction was easy, small mitered box, grooves for top and bottom, no big deal. But I wanted to locking system to require rocking the box in multiple directions to open it and what seemed simple turned out very finicky. Monday morning I know I wouldn’t make it. So I had to stop that and switch to some fast CNC carved signs. I got a bit creative with pictures for nieces and a friend, did my usual mask, carve, paint and finish all before about 2 PM on Monday the 24th. Then with spray lacquer still drying, put them in the car and headed to see my family. They came out great and everyone loved them. Sometimes our plans are bigger than our available time, eh? Unfortunately, I was in such a hurry I didn’t take pictures of the signs - doh!

Finished Puzzle Boxes.jpg

I did finish the boxes several days later, opting for a more simpler mechanic to open them. Wiped on some Danish oil and set them aside to dry. Now I’m nearly done for next Christmas, I guess. Still need to wipe some poly on after the oil cures, but that can happen anytime.


Ready to make holes.jpg

Then it was time to switch back to the engagement box. I wanted to add some decorative hearts to the inside of the lid, so I hand cut a bit of stencil mask, stuck it down and painted them. After that, it was time to steady myself, meditate, calm my nerves, practice steady breathing, etc. Why? Because I had to chisel two holes into the finished box so the top would have something for the locks to latch into and then drill through the sides for the tops pivot pins. So, yeah, I was about to cut holes in a perfectly good box. The side latch areas went smoothly, I just laid them out using my prototype, then carefully chiseled the areas out, taking just a bit at a time. I’d work the chisel around the edges, then chisel a file lines across and pop out the bit. Repeat this till I hit the depth I wanted. It was nerve wracking but went perfectly. Drilling the holes for the hinge pins went well too. I put a bit of tape on the sides so I could mark out the drill point, put a little tape flag on my drill bit to control depth and then just held the hand drill as straight and level as possible (it was too tall for my drill press). Went fine as well, the top pivots smoothly and locks and unlocks nicely. The top also got it’s coats of oil so it will wait a few days for it to cure then get some poly.

The engagement box will be done soon then. I’ll do some heavy use testing, make sure everything works perfectly. Then I’ll give it a nice photo opp, shoot some video and send it on it’s way. I’ll miss the little fella, it’s been a real part of my life this last year and a half.

I’ve got a sign to make now. Plus I have an old set of partially done puzzle boxes I’d like to unearth. I’d really like to get going on some new designs too. I have stock milled up for another set of boxes which I need to figure our the puzzles and locks and mechanisms for. So I’ll be keeping busy.

Conurers Alamaq.jpg

In the puzzling world I have a copy of The Conjurer’s Almanaq which is a kickstarter puzzle book. It shipped just before Christmas. I must say, I’m apparently better at creating puzzles than I am at solving them. I’m still on the first chapter and pretty well stumped. This is a puzzle hunt book, so you first have to find the puzzle, then solve it. Pretty sure I found the puzzle but a half dozen different solution attempts didn’t turn up anything that seemed right. Guess I’ll just keep working at it. It’s fun to try and I’m under no time pressure to solve it, that’s for sure.

Until next week, stay dusty!

Cryptic Woodworks Weekly Update for 26 Aug 2018

Drill Press Table - Editied Small.jpg

Hey, I've got a new drill press table!  If you read last week you'll know I was working on a new table but I ran out of 1/4x20 t-nuts and had to wait for them to show up.  Thanks to Lee Valley I had them in hand by Tuesday and was able to finish up the main table.  I already like it and I haven't even had to really use it yet.  With all the mounting points I can use every jig from my table saw sled here as well.  Just having all the toggle clamps available is so nice.  I milled out the center to take 4x4 inch pieces of 1/4" material so I can both rotate and flip them as they get chewed up.  I made a few out of some scrap pine.  The fence is pretty dirt simple, straight piece of baltic birch ply with a few slots cut it in - just move it around as needed.

Cross Slide Vise Mounting - Edited Small.jpg

Next up came a plate to mount my cross slide vise on that would also have holes to mount on the table.  I like having the cross slide and I think I'll use it more now that it's easier to mount.  It was a simple job, just lay out some holes to put some bolts that lined up with the mounting points on the vise, drill out some recesses with a forstner bit and the bolt the vise to the board.  Before you bolt it, though, drill holes that will line up with the holes in the drill press table.  I used my CNC for that to get them really precise.   Now, whenever I need the vise is a simple task to pop it on the table and lock it down.  I have been asked a few times if I mill on the drill press and the answer is no. Drill presses are terrible mills - you could damage the machine or have a chuck fly off and maybe get hurt.  But these vises can hold all manner of small things and move through the x-y axis nice and straight.  

I spent a lot of time this week on writing my upcoming article.  So that consumed most of my shop time.  I still consider writing about woodworking to be woodworking, though!  It's coming along nicely, at least I think it is.  I've never written a magazine article before.  

Final Button Box - Edited Small.jpg

I wrapped up the week dusting off my last remaining copy of The Button box.  This has been on the shelf a while.  It needs two new parts created, which is why it got shelved earlier.  These are just the slide locks and aren't a very difficult job, just a bit tedious to make sure the match up.  The original two were a slight bit short I didn't like how they worked.  Once those are done, I can put some oil on and then top coat.  This box is already spoken for, hence why I'm wrapping it up.  I just always seemed to be working on something else and never got back to this one.  Hopefully it'll be ready in a few weeks.  Feels good to finish this one up.  This was a fun run of boxes where I learned a lot.

On a slight side note, I wonder if anyone else has been on a walk in the woods, looked at all the trees and sighed, knowing you can't use any as lumber?  I love hiking and being out in the woods, but sometimes you see such great trees and know they have good lumber!  But we can't use it all.

Until next week, stay dusty!

Cryptic Woodworks Weekly Update for 19 Aug 2018

I got to have some fun in my bits of free time this week and use some of those jigs for making cube puzzles.  I cut up a bit of cherry into a bunch of 3/4" cubes.  I got pretty good accuracy but my variation was still from .001 to .003.  I'd prefer if it stayed within .001 as it does affect to working of the puzzle.  I think it might come from the tiny amount of play in my puzzle makers sled and if I put a little more force on one side I can shift the cut ever so slightly.  It's hard to take out that last bit of play because if I tighten it any further the sled can bind up in the miter slots.  So, I'll continue to work on it.  Perhaps a new hold down assembly will let me hold the block in place so I can have an even push of the sled with both hands.  It's close, it's real close.

Cherry 5 Piece Cube Small.jpg

I was glad to have made the edge beveling jig.  The first time I made some cube puzzles I beveled by hand on the sander and it took a long time with questionable accuracy.  This time, probably 5-10 minutes to finish 30 cubes and have them all come out nice and even.  Then it was over to the corner gluing jig which also worked great.  I just put a small amount of glue on the faces that needed it, held them in a place about 30 seconds and moved onto the next cube.  I made the 5 piece puzzle from Brian Menold's book.  Gluing went well, I had forgotten to glue one piece that I had to fix, but that's better than gluing one wrong!  I had to do a tiny bit of sanding on a few pieces to make it fit and work well.  All that's left now is to clean up the edges and add some oil to pop the cherry.

Drill Press Table Small.jpg

Then I was about to take some pictures of my drill press table for my upcoming article and I thought, you know it's about time I made a new table.  I wanted something with more functionality and it'll look really good.  I like the attachments on the table saw sled and knew it could be used on a drill press table.  After a bit of head scratching, some measuring and time with v-carve I had a toolpath for the CNC.  I'll have 50 or so attachment points and a replaceable center.  Wouldn't you know it, though, I ran out of t-nuts and I can't finish till that order comes in (luckily Lee Valley is pretty quick!).  I know it's a lot of hold downs, but I figured add a lot, they come in handy.  The CNC process took about an hour to finish the top and bottom layers.  The bottom layer has the holes for the t-nuts with a recess for them to sit in.  The top has the through holes and the cut out for the replaceable plate.  There are also holes for the bolts that attach the table to the drill press.  Once this is done I know that having the same toggle clamps and stops I use on the table saw available will be a big help.  Plus I can make a holder for the cross slide vice so it's easy to attach.

Bit of a light week, but nice to have some time to put another shop aid in place.  These can make a big difference down the road when I'm deep into other builds.

Until next week, stay dusty.

Week Ending 05 Aug 2018

Cipher Wheel Drying in Sun.jpg

I'm going to call this week "Why won't my finish dry?"  Last Sunday I put the Danish oil finish on the 2 constellation cipher wheels and then waited until Wednesday to start the Minwax wipe-on poly.  That should have been plenty of time for the oil to cure, it's how how I usually wait.  After applying the first coat of poly, which usually dries in 2-3 hours, it was still tacky several hours later.  I waited until morning, still tacky.  I put them outside whenever I saw the sun, still tacky.  Finally got them feeling pretty good by Friday night, put on another coat, same thing happened.  Let them sit with a fan on them Saturday, then out in the hot sun on Sunday and they are finally starting to feel like the finish is curing.  My thinking is that the US East Coast has had a monsoon season lately and it's very humid.  If the oil hadn't completely cured, it could slow down the poly.  Plus, humidity can slow down poly curing anyway.  So, it's a waiting game.  If they get pretty dry, I may just do a final coat of shellac to seal anything away.  And here I wanted them listed on Etsy today!

Photo Aug 03, 7 27 03 PM.jpg

The week was light so I decided to put some time into making a few a things I've wanted.  The first of these was a cube beveling jig out of Brian Menold's Wooden Puzzles book.  For a guide on how to make cube puzzles, this is a great book.  I don't know Brian or have any relationship with him, I just found his book very informative.  I whipped up one which is just two little beveled strips glued to a board that has a runner that rides in the disc sanders guide slot.  You put the cube in and sand each edge.  Keep flipping till they are all done.  This makes every bevel the same.  When I have a few more free minutes I plan to add another set to the other side with a slightly wider opening so I can do different bevels.  

Table Saw Sled Stops and Hold downs.jpg

After that I turned to my puzzle makers sled for the table saw,  I've needed to get some new attachments done for it, and this was the perfect time.  I made new stops that I can use together to make very small adjustments.  You can see in the picture the two stops above the right side of the fence.  The right most one stays fixed and it's separated from on to the left by some paper spacers.  Those bits of paper are around 0.015 inches, so by adding or removing them you can change the distance to the blade and make very small adjustments.  And it's as easy as loosening the left stop and making the change and tightening it back down.  Then I made the hold down you see on the left into a slotted adjustment so I can position it in more place - here you see it spanning the blade to hold a part in place. Keeps me from putting my hands that close!  I took some of the other toggle clamps and made their bases have slotted holes so can put them in more positions.  This was just a few hours and some scraps but it makes the sled that much more useful.  I have the stops made in both 1/2" and 3/4" thick varieties depending on my needs.  

I'll make some more stops and hold downs for the sled.  Last time I was at the home store I grabbed a bunch more button head bolts in varying sizes so I have plenty around to hold things on.  Good to keep a bunch of these and washers on hand to make the attachments needed!

I also started working on a new project, but this on is writing about the process of woodworking.  I'm going to love doing this, I have quite enjoyed keeping the blog up lately and also writing my Creative Thinking Blog.  I won't release too many details yet, but there may be some bits and hints over the next few weeks about what I'm doing.

The week had very little major project work, but some good time spent building and maintaining jigs.  That's time that can really pay off in the future.  I can totally recommend putting time into jig making, it will always help you.

Until next week, stay dusty!


Week Ending 29 July 2018

Where oh where has the week gone?  I could swear it was just Monday.  This happens far too often when you're an independent woodworker with a day job and a variety of other personal duties.  We try our best and we find times to still make a bit of dust.  And I managed to get some quality time in the shop regardless.

I have two of the new cipher wheels with the constellations on them oiled and drying.  The main work here was to carve the second one, get it painted and then cleaned up.  Then came time to make the dials that let you turn the inner disc.  These are just two discs made from 5/8" walnut.  I went simple and these and just drew them with a compass, cut them on a jig saw and sanded to my lines. 

Where I added some challenge was to make a hole in the center to hold a threaded insert.  I wanted a flat bottomed hole down to 1/8" from the bottom.  Regular brad point drill bits would have their points go through that last 1/8".  So, I mounted them in the CNC and made a quick program to cut them.  I had to put in a v-bit so I could align it's point with the center of the disc (from the compass), clamp it down then switch to a 1/8" spiral and make the cut.  Sure, it was probably overkill, but it worked great.

I installed the threaded inserts back at the drill press.  It's helpful to have another set of hands or clamps here (I had a wife!).  I cut the head off a 1/4 20 bolt so I could put it in the drill chuck them put the insert on it with a few nuts to hold it in place.  From here, lower the quill and turn the chuck by hand.  I repeat, turn this by hand!  Pressure on the quill while turning sets the inserts totally straight.  It's a great way to get the job done.

Constellation Cipher Wheel Oiled Small.jpg

Last was a bit of sanding, glue on the dials and then put a few coats of danish oil on all the parts.  Wipe them dry a bit later and now I'll let them cure a few days before top coating with some wipe on poly.  They oughta look great then as I get them posted to Etsy.  Oh yeah, after doing some photography.  Making some new videos would be cool too.

I'm also looking for other alternatives for laser work to finish off the engagement box commission.  The shop I wanted to use is closed while they move and it appears they are taking longer than expected.  Made some calls and have a new person to see this week.  We'll see.  I had hoped to use the Fab Lab maker space so I got the experience of using the laser.

That about did it for the week.  Not a lot happening, but really good to see some projects move along.  Progress is progress, always good to look at it that way.  Each day brings new challenges, new failures but new successes as well.  It's the successes we have to keep our eyes on.  Failures are just there as guides on what not to do.

Until next week, stay dusty!

Week Ending 22 July 2018

This week was mostly about drawing, but fortunately drawing for use in woodworking.  I recently purchased as Wacom Intuos drawing pad because I had wanted to get better at drawing and found I can use it for woodworking drawings too.  I have wanted to make new symbols for use on the cipher wheels and after a bit of looking and searching I decided to make a set of constellations.  These are similar to what you'd see watching the old Stargate show (love that show, hope it comes back sometime!).

Cipher Wheel Constellation small.jpg

Using the pad and another tool, Autodesk Sketchbook (currently free for hobby/student use) to draw all the constellation symbols.  I used some pictures found around the web as a guide.  The trickiest part is getting the thickness of the lines right as these will turn into v-carve paths for the CNC.  Sketchbook has tools for drawing straight lines or circles plus all the freehand methods.  It was a combination of both, some guided drawing then a bit of free hand to fine tune.

Once I had them drawn, I could save this as a .TIFF file and moved over to V-Carve (I use desktop 8.5, I should upgrade at some point).  Here I can import the tiff file and then trace it.  Since I drew the constellations as solid black shapes they traced well and I didn't need any editing.  All that was left was to group the right lines to make the full constellation and then arrange them around the ring, create the toolpath, export and carve away. 

I used the Oramask again and got some very nice cutting.  I found if I slowed down the CNC a bit I had less of a chance of lifting the mask.  It does add some time, but I'd rather wait a few more minutes than fix issues.  All the usual followed - paint, wait, peel off all mask and marvel at the new piece.  It came out looking great!  Painting did take a while, lots of little bits to fill in.  I tried a sample with spray paint but that has a tendency to bleed (maybe due to the alcohols in it).  Maybe I can get around that by first sealing with some spray shellac first.

I also carved a second center but didn't have time to paint it.  I had a few chip out spots I'll need to fix first (cut and stick little pieces of the stencil mask) before painting anyway.  I did mill up some new edging and wrapped the cipher wheel body.  Soon I'll have two new cipher wheels with the constellations as one of the cipher languages!

The other shop work was a bit of maintenance - coating the cast iron surfaces with some Boshield T9.  I've used that for several years now with pretty good success.  Spray on, wipe off and then I find after I wait a few hours I have to buff it down as it dries a tad sticky.  After a light buffing it gets nice and slick again.

Bit light this week, I know.  I'm hoping the Fab Lab is open again so I can get there and do the laser work for the engagement box and wrap that project up.

Until next week, stay dusty.

Week Ending 03 June 2018 Update

This started out looking like it another week that was going to make getting into the shop tough.  And that proved correct.  Monday was a holiday here in the US, Memorial Day, and then it was back to work.  The day job was just nuts and I had to work every night, so there went any possible shop time.  Hopefully this will let up so I can get back to the fun.

Engagement Box Side Catches.JPG

The weekend opened up and gave me some work time, even though the weather on Saturday was beastly hot and humid and it was June 2nd.  I didn't like the new side catches for the engagement box - they worked fine but thew were a tad jiggly.  So I made a new set that were a tad (like 3/32") longer, fit them and finished them.  I like the fit much better, there is a lot less play and I left them a tad tight in case I want to sand them ever so slightly.  They should work much nicely and look and feel great.  There is still the hole under it that used to hold the screw attached version, I haven't decided if I'll just leave it, since it's mostly hidden or maybe fill it with some colored epoxy.

Engagement Box Top Lock Design.JPG

I also got started on the top locking system.  My first try didn't work the way I wanted, it would unlock but the design of the catch was such that the springs wouldn't push it closed again.  So I worked out a way to use something more like a key that when turned will slide the lock open and the spring behind it will push it closed again.  I spent more time laying out dimensions on paper than I got to do woodworking, but that's not a bad thing.  Good plans are necessary.  My goal is to have a design that I can still take apart to work on if ever needed.  Plus, I had to work out a way that I could still install and remove pieces, so the piece holding the springs will be removable too.  After some tests with plywood and poplar I was ready to get onto the real thing.  I wanted to use maple, it's strong and more wear resistant (not that these parts will get a lot of use).  I had a little piece that with a bit of resawing gave me 2 pieces - I figure why turn good wood into dust on the planer.  A combination of the table saw, drill press and jig saw get these pieces in shape.  I'm sure I'll still have adjust things as I go.  And these are for a test lid - I'm not even working on the actual one yet!

I did notice that the iris drawer I have for the engagement back is now starting the stick a bit when opening the iris.  It could just be the extreme humidity and this is a mechanism that requires an accurate fit.  I'm hoping I don't have do do fixes or a rebuild here.  Even though, I was thinking of trying to re-cut the mechanism in plexiglass to see how it works.  And I haven't tried cutting plexi on the CNC yet so it'd be a nice excuse.

I didn't get time to do any cipher wheel work or major website work this week, but I plan on more.  I'd also like to add more sections to the website about building puzzle boxes, making mechanisms, types of puzzles, etc.  I still want to make a go of this professionally, so building a solid site and would really help, plus allow me to give back.

Till next week, stay dusty.

Week Ending 27 May 2018 Update

Boy, ever have one of those weeks where you you spend way more time dreaming about being i n the woodshop than actually getting to spend in the woodshop?  Well, I didn't even get that far.  It was a rough week with the day job which kind of stretched into the evenings too.  Couple that with a long holiday weekend and an extra day of vacation (in which you'd think I'd have more shop time) and a desire to get away a bit and my shop time was very slim.  But I saw Deadpool 2, so there's that.

What did I do?  Well, a bit.  I made a second top for the engagement box out of some scraps so I can work out the locking mechanism for it.  I tried one mechanism and while the movement would unlock it, it would re-lock itself.  That was frustrating as I had hoped it would work.  But alas, no.  So, back to the drawing board.  I think I'll switch back to more key driven ideas while what I was trying was a piece slid to the side when an angled wedge was pushed in.  A more traditional key would rely on the turn to move slider methodology.  

Having gotten stuck on the lock, I did spend a few hours fitting existing pieces of the engagement box.  I wanted to make sure everything was working perfectly and a few pieces movements were still just a bit fiddly.  Bit of sanding here, curve an edge slightly there, widen a gap just a tad.  The lock that holds the side door shut wasn't working the way I wanted.  So I decided to remake those pieces and change the mechanism just a bit.  At first I thought the new ones were a no go because they were too wobbly, but then I realized my gap was just a tad too large.  The gap was about .26 inches and the piece was around .238 inches.  I know, that seems tiny but it left a noticeable wiggle I didn't like.  Once I reduced that gap, it's snug but still movable.

I did some sort of woodworking.  I mean, I was working, and wood was involved.  I've had a stump from a pine tree that blew down over a year ago in the barn lot.  My last chainsaw died and I bought a nice shiny Stihl 311.  But, this stump eats chains.  I'm just trying to make the stump small enough to move, but these things grow around all kinds of rocks and dirt which means by the time you see the chain smoking in the cut, you know the blade is gone.  So, I got mad and picked up an axe.  It's going surprisingly fast, actually.  I just swing for 5-10 minutes when I'm free and I should have the stump cut down in another few chopping sessions.  Old School!

On the digital side of the business I added a new page to the cipher wheel section.  I didn't get time to record a new video even though I have an interesting one to do on a numeric rotation symbol cipher.  That should be fun!

Until next week, stay dusty!

Week Ending 13 May 2018 Update

This week was marked by finishing, fitting and finishing some more.  The 6 new cipher wheels are nearly wrapped up, the last coat of finish is drying.  Fitting them took a bit of work.  Getting one circular disc to run perfectly from a center pivot in a circular opening takes a bit of work.  Even tiny error mean it won't run totally true and need some sanding and adjusting.  I err towards the side of easier turning so that nothing can bind up over time.  

Finish strategy for the cipher wheels is to spray the carved wheels with shellac, let it dry then coat with a dark stain and wipe off.  I used General Finishes Nutmeg on these.  The shellac fills the carved areas and the shellac keeps it from penetrating the surfaces much.  Let them dry a good 4 hours.  The edging was pre-finished with Danish oil then cut to size, mitered and attached.  After everything was good and dry I top coated with 3 coats of Minwax wipe on poly.  Finally, I could wax the movements and assemble, using a bit of blue Loctite to keep the wheels in place but still turning.

While the finishing supplies were out I also top coated the puzzle box I am making as part of a commission.  It went on well and looks great.   Just two coats were needed for this.  This leaves me with just the top to make and that needs some laser burning on it.  I'm still working on how I want it's lock to work.  I'd like to do something with magnets, but I'm also thinking something spring loaded.

I also had a meeting of a new CNC club that should be fun going forward.  Knowledgeable group of people and fun too.  We spent some time discussing the types of problems we've run into and how to solve them.  Operating a CNC is the kind of thing that has a seemingly endless series of things that can go wrong.  My last problem was while making some cipher wheels - I had the router off with the pencil tip carving bit when I when I told it to start. The gantry moved that bit even though it wasn't spinning and there went $30.  Such is life.

Lastly was recording a new video for using the latest cipher wheels.  This one is about numeric shift ciphers.  Only took 3 tries to record a good one.  I still need to edit and upload it.  I certainly want to do more, using the symbols, numeric keyword shifts, symbol rotation, etc.  Lots of fun stuff to come.  I also want to add pages to the website to categorize and explain different encoding techniques.

Until next week!